Blog moved to http://blog.brittanyholidaycottage.com/
My subscription is due for renewal and frankly there are better blogging systems available for free, so I have decided to move my blog. I also felt that Radio Userland have not really developed their blog software in the last few years so over to Wordpress.
I have managed to export all my 500 posts from the last few years and import them into Wordpress. I'm still working on importing the comments and the new blog needs some tidying up, but essentially everything is there. Hopefully updating the blog should be a little easier with more 'modern' software.
Thanks to all those readers over the last four years and welcome to my new home at http://blog.brittanyholidaycottage.com/
| 11:59:59 PMStaircase
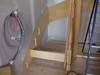
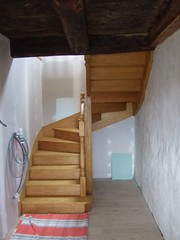 The staircase guys came this week to fit the stairs. Two men and a lorry arrived with all the bits Wednesday morning and they finished Friday lunchtime.
The photos show the construction process. I didn't actually see much of process first hand because for the two days we were trapped downstairs we finished off bits of plasterboarding in the kitchen and lounge and had a major tidy up to move all the materials and tools into the garage ready to tile the kitchen floor.
The staircase is made of a hardwood (not sure of the name) but during construction it did look quite yellow, however right at the end it was all sanded down and a light oak tint was applied. That really made quite a difference to the look and brought up the grain.
The guys suggested that I should apply a clear wax coating to stabilise the tint to prevent further darkening over time and also to protect and nourish the wood.
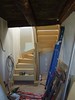

The stairs were quite expensive, but I'm really pleased with the result. They just seem to curve and sweep up the stairwell and walking up and down is really comfortable. Each step is about 30cm wide and the rise is very shallow. Compared to an off-the-peg staircase it's a world of difference. But then I have to say that to convince myself of the extra expense.
| 12:04:09 PMLiving room and hall
 With the floor finished the metal studwork has been built in the lounge, insulated using 100mm glass fibre with a vapour barrier.
The photo was taken a couple of days ago and the room has now been plasterboarded. There is also a wall for the hall that runs across separating the stairs and front door from the lounge. You can just see the edge of the wall as the camera position is in the hallway.
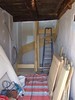
Yesterday I started taping and jointing the stairwell at the end of the hallway because the staircase guys are coming on Wednesday to fit the stairs. If I can get the stairwell prepared and an undercoat painted before then it will make life much easier protecting the stairs from dust and muck.
Once the staircase guys start, we can start work on the kitchen as they reckon it will take a couple of days to fit the staircase.
| 10:28:48 AM
Floor finished
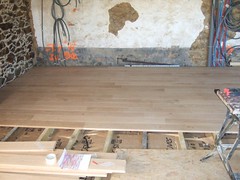 It took a little longer than expected but finally the oak floorboards are down ! I'm really happy with the result and very pleased with the look of the boards.
The photo only shows progress half-way across the floor, but you would get the general idea.
After my previous experience of laying pine floorboards I was much more careful about getting every row straight and flush before proceeding with the next row. Every plank was checked for splinters, or muck in the groove and all the tongues swept of dust etc. before the next row was placed. Occasionally a board did not quite seat correctly and needed clamping to pull everything together. This time I used some old sash cramps in reverse to squeeze the boards against each other to ensure I always had a straight edge to work against. 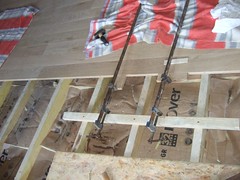 Fortunately there were only a couple of instances where I needed the cramps but it does slow up the process. Compared to the pine planks before these were much much better.
One thing that made progress quite slow was the nailing. I did do some research and found that there is a special floorboard nailing gun that fires the nail into the tongue at 45 degrees and punches it home. The perfect tool for the job. However all the hire shops I visited with picture of tool in hand either gave me a shrug of the shoulders or said, 'Yeh, seen one of those on tele, but we just do it by hand'. I did find a local shop that could order and sell me one, but at 500+ euros it seemed a little expensive for a one off job.
Impatience and the cheapskate in me decided to do it by hand. How difficult could it be to bang in a few nails :-) Well it turned out that getting the right nails was a challenge in itself.  I wanted lost head nails with serrations (barbs) down the shaft because I was nailing through hardwood into softwood and wanted the extra grip to hold the planks down and stop and squeaking and movement in the future. Again, trips to several DIY stores and builders merchants turned up nothing. Even the builders merchant thick nail and screw catalogue had nothing suitable to order. In the end I settled on a stainless steel nail with serrations, but a rounded head. Therefore every nail had to countersunk, and banged home (with some difficulty) with a punch. My hammering skills have certainly improved over the last few days, however I did catch the edge of some boards with the hammer head, so a few little dents here and there. Oak is tough, but not that tough. Any ideas on how to remove the dents on the edges of the planks would be appreciated.
 BTW - If you are wondering about my crazy multi-coloured floor laying plan, the inventory of planks supplied by the sawmill might explain things.
So after four days, 1000 nails, a sore back and forty square meters, we have a floor. No more mud.
| 9:06:57 PM
Progress update

Progress has been fairly good recently. I've been a bit tardy updating the blog because of the long days and general tireness.
 Some more of the plumbing has been completed with piping runs to the kitchen area and bathrooms. The hot water tank has also been installed, however not operational yet. Most of the pipework is turned off, isolated at the valves, whilst the bathrooms are being tiled. The only other work upstairs that has been completed is that the floors have been cleaned (with methylated spirits) and varnished.
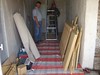
The majority of the work is being concentrated downstairs at the moment, the reason being is because the staircase is due to be fitted in a couple of weeks and the lounge and corridor was still a mud floor. Also the oak floorboarding we ordered was available for collection. The floorboards have to rest in the room for a couple of weeks before laying to acclimatise, so we had to dig out the mud floor to lay the joists. 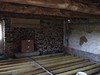 Each joist is 6m long by 15cm by 5cm. The mud floor was covered with a plastic membrane then each joist laid at 40cm centers on the membrane and packed with concrete 'pads' every meter or so to ge the levels correct.
 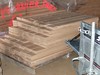 This had to be done before collecting the floorboards, and the floorboards have to be laid before the staircase arrives. Everything has been a bit hectic, with everything, tools, equipment etc. all packed into the kitchen area, which still needs tiling, but there's no floor space, so the floorboards need laying, but... arrggg!!!!
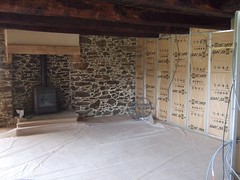
Before laying the floorboards we have had to build the fireplace hearth using an old granite lintel and some other bits of stone, install the stainless steel chimney liner and woodburner (don't want rain and/or soot all over the new oak floor), new front door (the old one was rotten and too small and the rain blew in underneath), run electric cabling in the lounge/corridor for lights, cockets, TV, Telephone, heating etc, varnishing the oak beams, and what seems like dozens of minor jobs that should be finished before the floor and staircase.
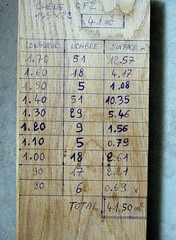
Oh, the crazy picture at the top. That's the floorboard laying plan. The floorboards came in a variety of lengths, about 80% of them between 1.3m and 1.7m with some other shorter ones. Hence to avoid wasteage and cutting we have the plan :-).
| 9:22:27 PMPlumbing started
 I finally got around to starting the plumbing.
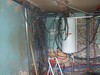
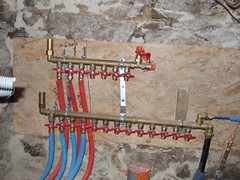
Actually this contraption, that looks like the control deck of a submarine, is the 'nerve center' of my plastic plumbing system. I hope I'm using the French equivalent of top quality barrier pipe :-) Steve ?
From now on new runs are going to be dead easy as I just attach the length of pipe to the manifold and run the other end to the appliance, turn on the valve and voila, water. Yep, that thing is now full of water at 5 bar.
The reason there are more cold feeds than hot are because of toilets, dishwasher and washing machine. Also the strange brass things at the end of each manifold is an anti-knock device to prevent water hammer. Not sure it's really needed, but why not.
| 12:07:18 AMNew window opening
 Almost finished the new window for the downstairs office this afternoon. There is a little stonework inside to do but basically the window is in.
The window frame was made from some oak beams of 10cm by 20cm sections to take a 60cm by 75cm window. That's the internal dimensions of the window. The window is actually about 4cm larger all around as it is fitted to the inside face of the frame. Just for fun and a little authenicity I used oak pegs to made the joints in the frame. Because the joints in the frame might leak on the window sill there are two channels cut into the underside of the sill and a plastic membrane running under the sill and up behind the window. Hopefully this should allow and water to drain away outside, rather than collect in the wall and cause a damp problem inside.
 Making the hole in the stone wall is a little scary, as the hole always seems to end up about twice the size that you need it because of errant large stones. From the photo you can see the inside beam at the top of the hole that protudes right into the wall. The new window was deliberately positioned right under this beam so that I only needed to use one acro prop to support all the stone above the window. As you can see quite a lot of stone still falls out which all needs putting back in. Personally I use quite a dry mix of mortar so that there is very little 'cement water' that seeps out to stain the face of the stonework. Any mortar is also raked out at this stage to leave a gap between the stones for pointing later.
 The inside of the window is just shuttered with some old planks and concrete used to fill out the inside wall. I used a couple of bits of oak beam to make the internal lintel then infilled with stone above. The internal lintel is not shown in this photo. The internal stonework and concrete has to wait until the external stonework is complete, but not all the external stonework can be done at once. Therefore this whole process has taken several days, by building up several layers of stone outside, backfilling with concrete, then more outside stonework etc. etc.
Personally I pretty pleased with the end result. Things are really starting to move along quite swiftly and the downstairs rooms should start taking shape soon.
| 7:17:19 PMStaircase
The last major shopping decision is the staircase. I've been toying with the idea of buying an off-the-shelf hardwood staircase and fitting that. The only problem is a standard height staircase is about one step higher than I need. I could cut off the bottom step and adjust the banister etc. to fit, but it's not something I relish.
Now that the oak flooring has been ordered I thought I might as well go the whole hog and order a made-to-measure staircase and have it professionally fitted. I've decided to use a local guy because I've used him before to fit two staircases into some gites, and he did a good job.
Again, the cost is an issue and it's going to be an extra 1500 euros compared to an off the peg solution, but the staircase will be hardwood, with a oak tint applied. It's also a job I can just forget about and I think worth the extra because you can see the quality of a hand-made staircase and it should add a little more of the wow factor (and hopefully value) to the house.
I'm glad the shooping week is over !
| 12:24:34 PMOak and tile flooring
Now that the renovation has moved downstairs I had to face up to one of the worst jobs. Shopping.
The lounge is going to be floorboarded and the kitchen area tiled, so to proceed much further floorboards and tiles need to be bought and a staircase chosen.
I used pine floorboards upstairs but really wanted oak or chestnut downstairs. It's much tougher, looks better and is more in keeping with an old cottage. Looking around the DIY shops, oak and chestnut floorboards came in at about 80 euros/m2. For a 40m2 space that really starts to get expensive. Fortunately someone recommended going direct to a sawmill to save money. This turned out to be a really good idea. We visited two sawmills, one in Combourg and another near St. Brieuc and had a surf on the 'net. It was really nice to see trees going in one end and finished flooring etc. coming out the other end. Kind of felt more satisfying to buy than from a DIY store.
The choice at the sawmills was a bit daunting, various widths, lengths and knottyness (quality) to choose from, but eventually we settled on some 15cm wide oak tongue and groove planks with lengths varying from 1m to 2m. There is a 3 week delay and then we should leave the wood to aclimatise in the room for another 2 weeks, but at least that was one job done and for 50 euro/m2. Well worth shopping around.
Floor and wall tiles next. I don't find making decisions on colour combinations that easy, and choosing the wrong colour floor tiles can really affect the style and limit later choices for wall and kitchen colours. Anyway, after much head scratching and umming and arhing we chose light terracotta style floor tiles and, a bit boring, white bathroom tiles. We did get some coloured border tiles to brighten things up a little.
All the tiles, grout, adhesive etc. was brought from a large DIY store in St. Brieuc. Normally it about a 40 minute drive. However with the trailer and car full of tiles we were seriously overloaded. I reckon the trailer was several hundred kilos overweight on it's own. Just to get the tyres back to a roughly round shape took a while with the air hose.
Driving back was certainly a bit of a hairy experience. Any faster than 70kmh (40 mph) caused snaking and bouncing and something not to be recommended. It's a bit scary going that slow on main roads. The journey back took 30 minutes longer than normal and it was a relief to get back in one piece.
It's very easy to under-estimate the weight of tiles.
| 12:11:22 PMLime Rendering
Apart from a couple of small bits of in-fill around the dormer windows all the plasterboarding upstairs is now finished. I didn't have any scrap pieces large enough and I didn't want to use up a whole board just for a small bit. Once I start plasterboarding downstairs I can use any larger off-cuts to finish upstairs.
The last couple of days have been spent lime rendering an internal cob and stone wall. I could have just stuck plasterboard over it but I thought it would look a little more authentic and rustic with a traditional lime render.
The lime render is made up of just lime (Chaux blanche hydraulique naturelle), sand and water. The instructions on the bag said one sack of lime (35kg), 11 buckets of sand (10L buckets) and two buckets of water. However after chucking the water, lime and half the sand in the mixer we realised the mixer was too small and had to spend along time juggling the contents of the mixer and two wheelbarrows taking half out, adding sand, removing some, adding back etc. etc. Not a good start.
 Never having plastered before it was a real steep learning curve and through trial and error we finally got all the render on the wall. At first it was a real problem getting it to stick. I had brushed all the loose dust off, but just pushing it on with the float didn't really work very well. The mix was quite creamy, but gritty with the sand. Wetting the wall with a water spray helped alot but the technique that really worked was to throw the render onto the wall, flicking it quite hard, then spread it out with a float.
The hardest part was keeping a wet edge as you worked. If the edge dried out at all it was really tough to blend in the adjacent new render without leaving a line or bump.
With hindsight, I think we should had wetted the wall much more, and thrown the lime render much harder at the wall. As it dried out it did crack in quite a few places and a couple of spots sounded a little hollow where it had not stuck quite right. It certainly looks rustic tho'
Overall we covered about 30 square meters of wall in a day and a half and used around 6 bags of lime. Really hard work and not something I want to do again in a hurry.
| 11:32:59 AM