Ceiling studwork
With the floorboards laid I could now proceed with the ceiling.
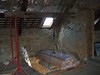
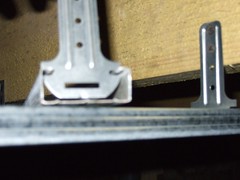 The plasterboard for the ceiling is screwed to metal rails suspended from the rafters I fixed in last week. From the photo you can see a complete rail and bracket fixed to the rafter. Resting on top of the rail is a scrap piece and the bracket to show how it fits together. The brackets are simply screwed to the rafters at 40cm centers and once in place the rail is pushed onto the brackets and hangs there.
As usual getting everything level was important. The hardest part of the job was the measuring and levelling. It's really difficult on your own to measure long distances or hold a level with one hand and measure with the other whilst up a ladder. In the end I used bits of string stretched tightly across the room at the correct height. It did mean a lot of up and down and moving step ladders but I got there in the end. The bottom edge of the rail is set at 2.5 meters (plus 13mm for the plasterboard) above the lowest point of the finished floor height. Using the strings as guides each bracket is screwed to the rafters. Various lengths of brackets are available, so it's not too important that the rafters are level as the brackets take up any slack.
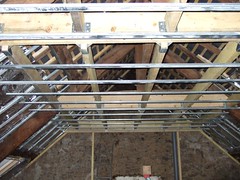 All the brackets and rails in place as shown. Personally I find that using this metal rail system really easy and prefer it to using wood. Also there is no danger of rot or woodworm and all the rails are straight and consistent. Now the rails are up I can order my plasterboard and fit the electric cabling for ceiling lights and put up the plasterboard. With the ceiling in place the internal stud walling can be considered.
At last things are starting to take shape.
| 1:40:52 PM
Floorboarding
 My goal this week
was to get the metal ceiling channels installed on the new rafters
ready for the plasterboard. However before putting up the metalwork I
had to lay the floorboards to ensure I had the correct floor to ceiling
height and to give myself a level/flat datum to work from.
My goal this week
was to get the metal ceiling channels installed on the new rafters
ready for the plasterboard. However before putting up the metalwork I
had to lay the floorboards to ensure I had the correct floor to ceiling
height and to give myself a level/flat datum to work from.
The existing floor was old pine floorboards but unfortunately they have suffered over the years with woodworm (now treated) and a fair bit of damage in places. They were also a little springy and had dips in places where the oak beams below have settled and sagged over time.
I did consider running a sander over the whole floor but a small test area didn't come up well and all the boards have been fixed by nailing through the boards with large headed nails making sanding almost impossible.
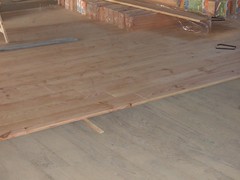
The replacement boards are 15cm wide tongue and groove maritime pine. As you can see from the photo I've laided them perpendicular to the existing boards. This seems to have helped stiffen the whole floor and mostly taken out the lumps and bumps. There is a little packing in places which I just slipped in as I went along. I wasn't aiming for the perfect flat floor as it is a 500 year old building.
The first row of boards across the space was crucial to get right and took quite a bit of fiddling around with tape measures and pythagoraus to make sure the whole lot was square. The first row was placed with the groove against the wall and nailed in place into the floor leaving the tongues on the working edge towards me. Working from left to right across the room each new row was fitted and tapped home with a piece of scrap board slotted over the tongue to protect it from the hammer. I used 50mm lost head nails hammered at a angle through the tongue into the old boards below. The nail heads were then punched below the surface with a nail punch. The waste from the board cut to length on the right hand side was used to start the new row on the left hand side giving a staggered finish across the floor.
The whole exercise was relatively easy except when there was a bowed board in the pack. It took a few banana shaped boards to realise what was making it difficult to make all the floorboards fit snuggly together. Once a small gap creeps in the error just compounds itself making the job harder and harder. I ended up leaving out the bowed boards as I didn't have any way of clamping the boards together. I've since found out that I could have used those speed cramps and turned the cramping end around so it expands and pushes against a temporary batten. Also the Readers Digest website showed a technique using a baten and a wedge to push bowed boards together. I know for the next time.
Anyway, floor in, and now I can move on to the ceiling.
| 1:23:02 PM
Ceiling rafters installed
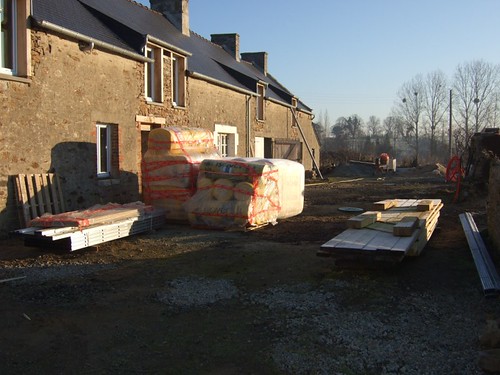
 Well all my stuff arrived Monday morning first thing on the lorry. Piles of wood, insulation and metal studwork bits.
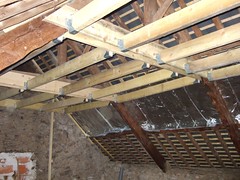
Some of it has gone to preparing the ceiling on one side of the house. This side has a flat ceiling 2.5m high (the length of a plasterboard), whilst the other side is plasterboarded between all the woodwork up to the ridge. The reason is partly to gain a little loft space and somewhere for various bit of ventilation and pipework to run.
The rafters are fixed just over 2.5m above the finished floor height and then metal track is suspended on small hangars perpendicular to the rafters. The plasterboard is then screwed to the metal track, hopefully flat and level with the floor. By getting the height correct the stud walls should be easy as they just pop straight in without cutting :-)
| 4:15:28 PMTwo downstairs windows fitted
Been busy this week juggling several jobs.
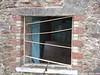
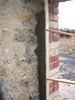
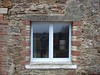
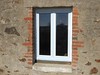
Two new windows have been fitted downstairs. The replacement windows are just direct swaps for the old windows, but as usual with old houses nothing is ever quite that simple. Getting the old windows out took much longer than anticipated. The old wooden windows had been cemented in place along with some metal brackets cemented into the stonework inside. Removing the old windows meant lots of chipping away around the frame to get all the old mortar out. The downside was that once removed, the inside face of the brickwork was not vertical or very flat. Not ideal for the new windows.
The first two pictures show some batons of wood fixed around the inside of the window to provide a guide for adding mortar (strong mix) to the inside face of the window opening. The brickwork was about 1.5cm off vertical between top and bottom. Once the mortar was set it was actually easy to fit the new windows, just a bead of silicon and some simple metal angle brackets to screw the window home. Between the sill and the bottom of the window I also added an expanding waterproof foam strip, compriband, for extra protection against water ingress.
 |
|
 |
 |
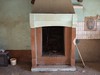
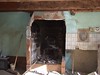
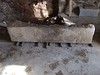
Whilst the mortar for the windows was setting I was also able to tackle the old fireplace in the kitchen. As in the lounge this was once a traditional, very large, Breton fireplace (a bit like an inglenook) but also bricked up with a smaller breeze block fireplace painted green and brown! The kitchen didn't need a fireplace so it was to be demolished and blocked up. The chimney stack will be re-used by the house next door. Once all the breeze block was removed and the concrete hearth lifted I found, yet again, the original granite mantlepiece. Fortunately this time it was in one piece and in good condition. I intend to use this to re-create the hearth in the renovation fireplace in the lounge.
 |
 |
 |
 |
And if all that wasn't enough I've also been shopping for materials. I've bought 80 square meters of maritime pine floorboards to plank out upstairs. Fortunately the local supermarket had a promo on for various DIY tools and I bought a 2 tonne chain hoist (palan a chaine) for just 24 euros. It made light work getting all the floorboards upstairs and also came in useful to lift the granite mantelpiece out of the floor.
 I've also ordered
from the builders merchants loads of wood, metalwork for stud walling
and insulation. That all arrives tomorrow morning, so I'm going to be
fairly busy for a while. I did originally also have 400 square meters of
plasterboard coming but I've delayed that for now, otherwise it just
gets in the way.
I've also ordered
from the builders merchants loads of wood, metalwork for stud walling
and insulation. That all arrives tomorrow morning, so I'm going to be
fairly busy for a while. I did originally also have 400 square meters of
plasterboard coming but I've delayed that for now, otherwise it just
gets in the way.
Oh, alongside all this activity Debbie has also been doing some garden designing. The weather has really started to feel like spring for the last few days which has spurred us on about the garden.
No rest around here recently.
| 3:45:39 PM