Floorboarding
 My goal this week
was to get the metal ceiling channels installed on the new rafters
ready for the plasterboard. However before putting up the metalwork I
had to lay the floorboards to ensure I had the correct floor to ceiling
height and to give myself a level/flat datum to work from.
My goal this week
was to get the metal ceiling channels installed on the new rafters
ready for the plasterboard. However before putting up the metalwork I
had to lay the floorboards to ensure I had the correct floor to ceiling
height and to give myself a level/flat datum to work from.
The existing floor was old pine floorboards but unfortunately they have suffered over the years with woodworm (now treated) and a fair bit of damage in places. They were also a little springy and had dips in places where the oak beams below have settled and sagged over time.
I did consider running a sander over the whole floor but a small test area didn't come up well and all the boards have been fixed by nailing through the boards with large headed nails making sanding almost impossible.
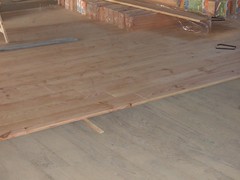
The replacement boards are 15cm wide tongue and groove maritime pine. As you can see from the photo I've laided them perpendicular to the existing boards. This seems to have helped stiffen the whole floor and mostly taken out the lumps and bumps. There is a little packing in places which I just slipped in as I went along. I wasn't aiming for the perfect flat floor as it is a 500 year old building.
The first row of boards across the space was crucial to get right and took quite a bit of fiddling around with tape measures and pythagoraus to make sure the whole lot was square. The first row was placed with the groove against the wall and nailed in place into the floor leaving the tongues on the working edge towards me. Working from left to right across the room each new row was fitted and tapped home with a piece of scrap board slotted over the tongue to protect it from the hammer. I used 50mm lost head nails hammered at a angle through the tongue into the old boards below. The nail heads were then punched below the surface with a nail punch. The waste from the board cut to length on the right hand side was used to start the new row on the left hand side giving a staggered finish across the floor.
The whole exercise was relatively easy except when there was a bowed board in the pack. It took a few banana shaped boards to realise what was making it difficult to make all the floorboards fit snuggly together. Once a small gap creeps in the error just compounds itself making the job harder and harder. I ended up leaving out the bowed boards as I didn't have any way of clamping the boards together. I've since found out that I could have used those speed cramps and turned the cramping end around so it expands and pushes against a temporary batten. Also the Readers Digest website showed a technique using a baten and a wedge to push bowed boards together. I know for the next time.
Anyway, floor in, and now I can move on to the ceiling.
| 1:23:02 PM